Start by relieving the pressure in the fuel system. Remove the gas cap to allow vapor pressure in the tank to escape. To depressurize the fuel lines, depress the schrader valve on the fuel rail in the engine compartment. Use a rag to catch any fuel that will escape. If you have not started the engine for a while, there may not be a lot of pressure still in the fuel lines.
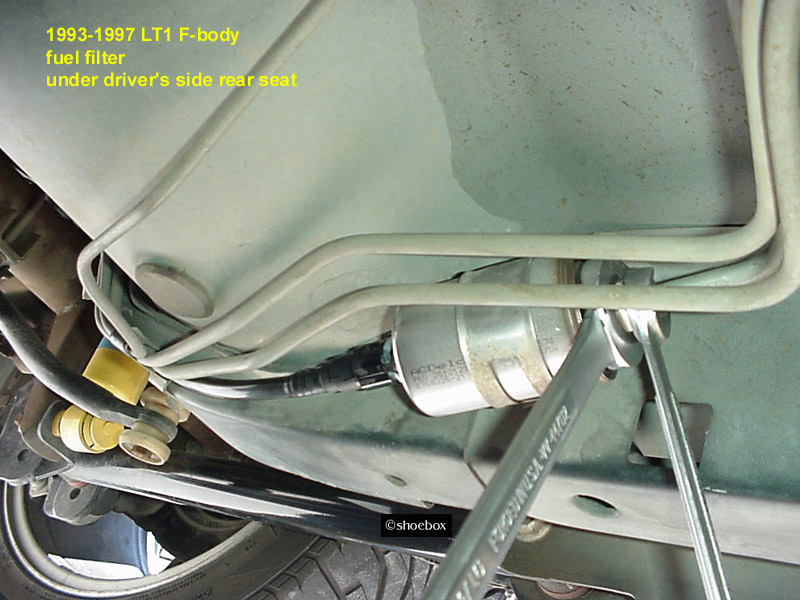
The fuel filter is located under the car and forward of the driver's side rear wheel. You will need to raise up the car to have room to work. Always support the car properly and safely when working underneath.

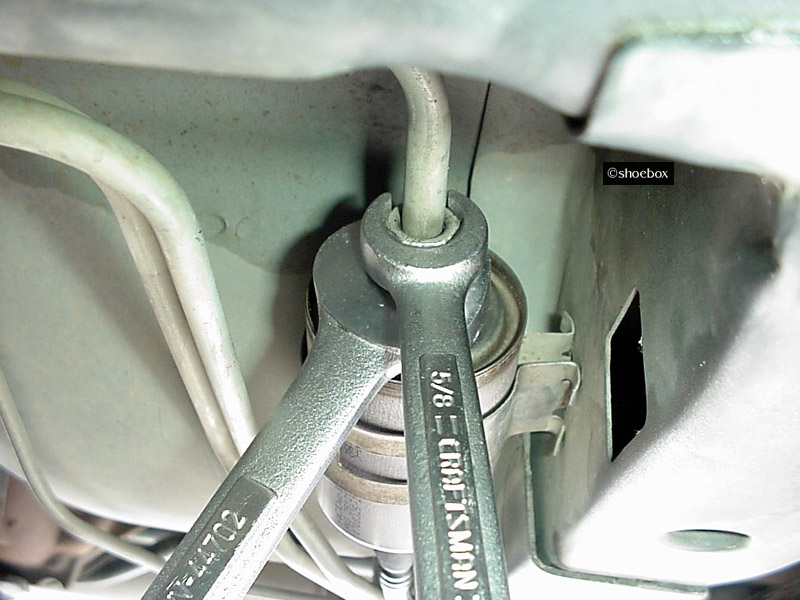
Have some rags and a suitable pan to catch any fuel. You might also want to have some eye protection. The small fitting on the front side of the filter is a 5/8". Use a flare nut wrench if possible. This will help to prevent stripping of the flare nut if it is very tight. "Back-up" the large, attached nut that is on the filter with a 13/16" wrench (that seemed to be the closest (but not perfect) fit for me) or use a firmly attached large adjustable (ex. Crescent) wrench.

Hold the large nut on the filter still, while you turn the small fitting counter-clockwise. If you position the wrenches in the right way, you can "squeeze them together" to loosen the nut.
When you crack open the fitting, expect some fuel to come out. It may spray if there is any pressure left. Have a catch pan and rag handy and watch your eyes. Loosen as needed to regulate fuel drainage. There is a bit of play in the metal line that should allow you to move the line and fitting away from the end of the filter. Just give it some gentle persuasion. This is needed to be able to slide the filter forward and out of the holding bracket.
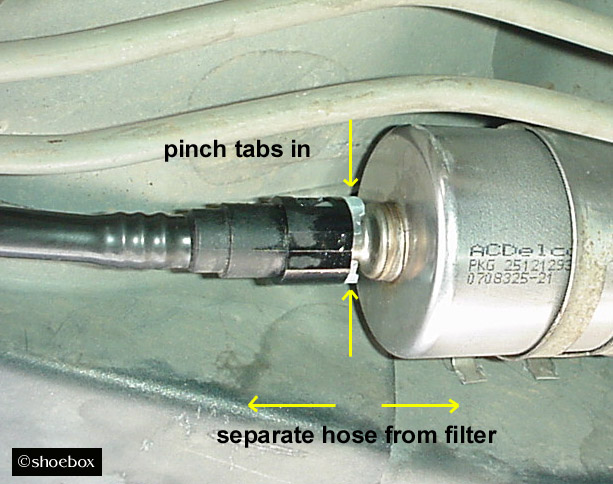
When fuel is no longer coming out (or whenever you feel you have waited long enough), squeeze the plastic tabs on the fitting on the rear side of the filter (you can even cinch a zip tie over the tabs to hold them down). You may have to wiggle the filter as you slide it forward and out of the plastic hose. It's better to slide the filter forward than to try to pull the hose off to the rear. The hose has little play and may kink if it suddenly comes free. More fuel may come out at this point, so be ready.

Once clear of the plastic line, the filter can slide forward and out of the bracket. Insert the new filter in it's place. Align and clip the plastic hose on the new filter. Move the metal line and fitting back into place on the front side and spin the nut down by hand. Use your wrenches as before to tighten it up, firmly. No need to go crazy with torque.
When it is all back together, secure your gas cap and pressurize the system. It will take a few times of turning the key to ON (the pump will prime for 2 seconds and shut off), turn the key to OFF for about 5 seconds. Repeat ON and OFF about 5 times. Check under the car for any leaks. If the car is secure enough, you may want to start the engine and check for leaks, too. Be sure you put the cap back on the schrader valve. Lower the car and you are done.
edited 2/13/2004